TeachWhat! Developer Guide
Table of Contents
- Introduction
- Acknowledgements
- Setting up, getting started
- Design
- Implementation
- Documentation, logging, testing, configuration, dev-ops
- Appendix: Requirements
- Appendix: Instructions for manual testing
Introduction
TeachWhat! is a desktop application that helps private Tutors manage their students and classes.
Acknowledgements
- TeachWhat! is adapted from AddressBook Level-3 (AB3)
- Libraries used: JavaFX, Jackson, JUnit5
Setting up, getting started
Refer to the set-up guide.
Design
Architecture
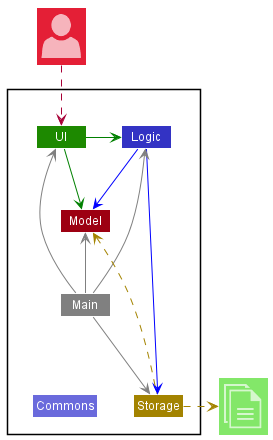
The Architecture Diagram given above explains the high-level design of the App.
Given below is a quick overview of main components and how they interact with each other.
Main components of the architecture
Main has two classes called Main and MainApp. It is responsible for,
- At app launch: Initializes the components in the correct sequence, and connects them up with each other.
- At shut down: Shuts down the components and invokes cleanup methods where necessary.
Commons represents a collection of classes used by multiple other components.
The rest of the App consists of four components.
-
UI: The UI of the App. -
Logic: The command executor. -
Model: Holds the data of the App in memory. -
Storage: Reads data from, and writes data to, the hard disk.
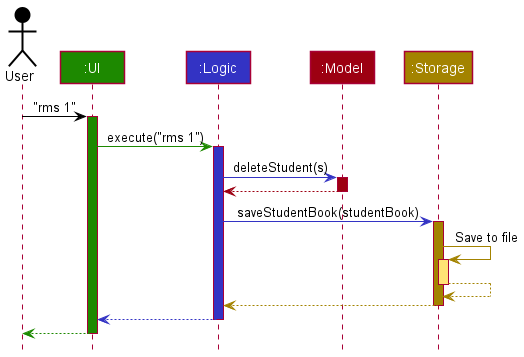
How the architecture components interact with each other
The Sequence Diagram below shows how the components interact with each other for the scenario where the user issues the command rms 1.
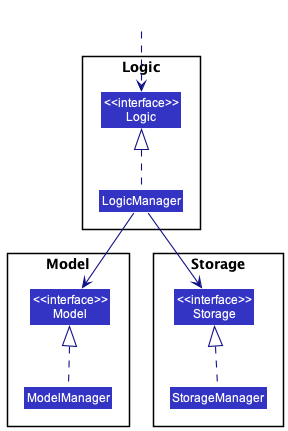
Each of the four main components (also shown in the diagram above),
- defines its API in an
interfacewith the same name as the Component. - implements its functionality using a concrete
{Component Name}Managerclass (which follows the corresponding APIinterfacementioned in the previous point.
For example, the Logic component defines its API in the Logic.java interface and implements its functionality using the LogicManager.java class which follows the Logic interface. Other components interact with a given component through its interface rather than the concrete class (reason: to prevent outside component’s being coupled to the implementation of a component), as illustrated in the (partial) class diagram below.
The sections below give more details of each component.
UI component
The API of this component is specified in Ui.java
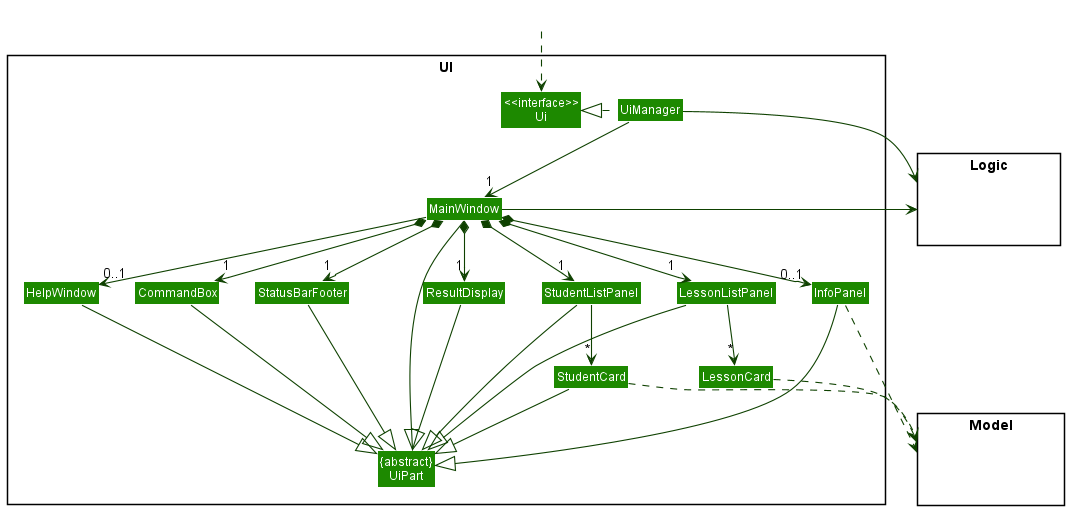
The UI consists of a MainWindow that is made up of multiple parts eg. CommandBox, ResultDisplay,
StudentListPanel, InfoPanel etc. All these components, including the MainWindow inherits from the abstract
UiPart class which captures the commonalities between classes that represent parts of the visible GUI.
The UI component uses the JavaFx UI framework. The layout of these UI parts are defined in matching .fxml files
that are in the src/main/resources/view folder. For example, the layout of the
MainWindow is specified in
MainWindow.fxml.
The UI component,
- executes user commands using the
Logiccomponent. - listens for changes to
Modeldata so that the UI can be updated with the modified data. - keeps a reference to the
Logiccomponent, because theUIrelies on theLogiccomponent to execute commands. - depends on some classes in the
Modelcomponent, as it displaysPersonobject residing in theModel.
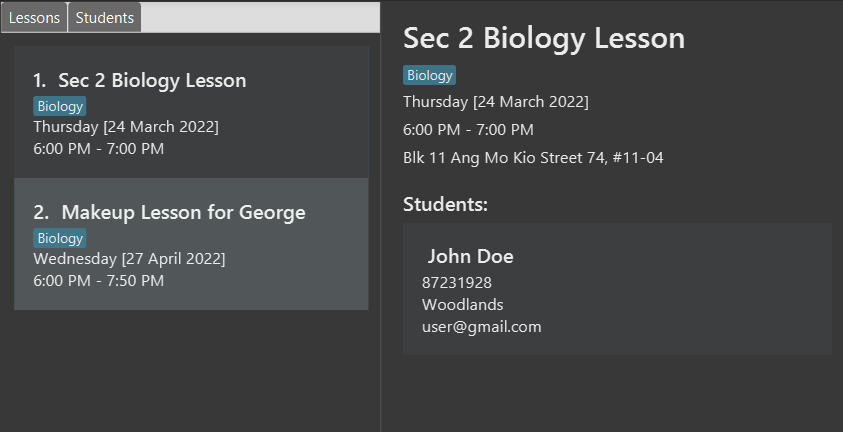
The bottom half of the UI component is split into two parts using a SplitPane component from
the JavaFX UI framework.
The left pane contains a TabPane that contains two tabs which hold a
LessonListPanel and a
StudentListPanel.
The Lessons tab contains a
LessonListPanel which lists out Lesson entries
while the Students tab contains a
StudentListPanel which lists out Student
entries.
To switch between the tabs, the methods MainWindow#toggleLessonTab() and MainWindow#toggleStudentTab() can be used
to switch between the Lesson tab and Student tab respectively. Switching the tabs by using user commands is
done by the method MainWindow#toggleTab().
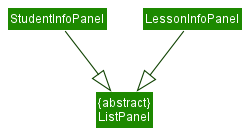
The right pane contains an InfoPanel
component can either show the details of a Lesson entry or Student entry. A
LessonInfoPanel is used to show the details of a
Lesson entry, while a StudentInfoPanel is used
to show the details of a Student entry.
The methods MainWindow#populateInfoPanelWithLesson() and MainWindow#populateInfoPanelWithStudent() can be used to
populate the InfoPanel with the provided entry. Populating the InfoPanel using user commands is handled by the
method MainWindow#handleInfoPanelUpdate().
Refer to Viewing a Lesson or Student’s details implementation.
Logic component
API : Logic.java
Here’s a (partial) class diagram of the Logic component:
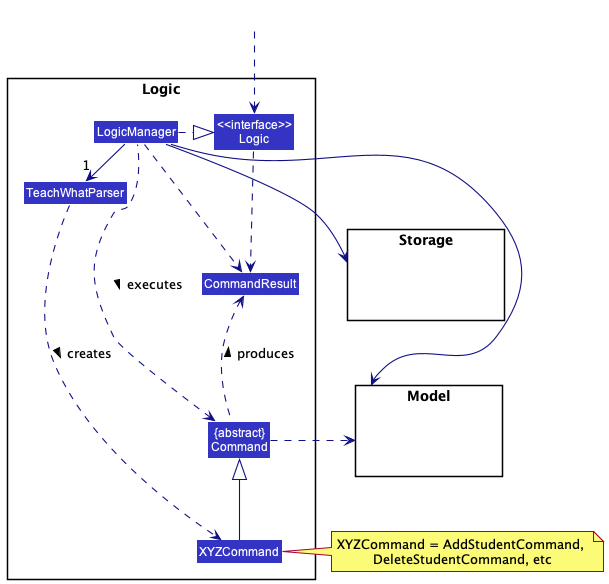
How the Logic component works:
- When
Logicis called upon to execute a command, it uses theTeachWhatParserclass to parse the user command. - This results in a
Commandobject (more precisely, an object of one of its subclasses e.g.,DeleteStudentCommand) which is executed by theLogicManager. - The command can communicate with the
Modelwhen it is executed (e.g. to delete a student). - The result of the command execution is encapsulated as a
CommandResultobject which is returned back fromLogic.
The Sequence Diagram below illustrates the interactions within the Logic component for the execute("rms 1") API call.
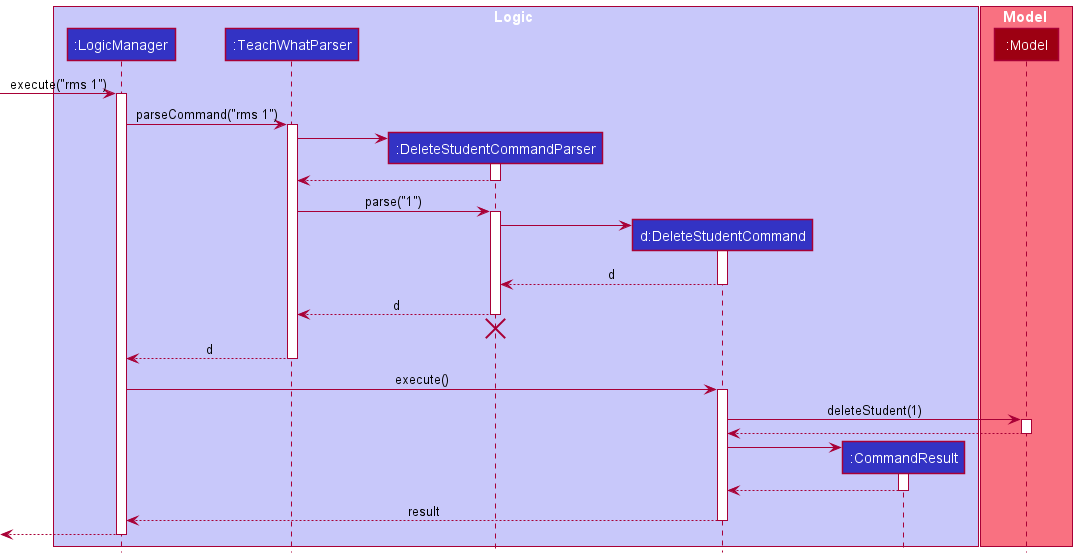
DeleteStudentCommandParser should end at the destroy marker (X) but due to a limitation of PlantUML, the lifeline reaches the end of diagram.
Here are the other classes in Logic (omitted from the class diagram above) that are used for parsing a user command:
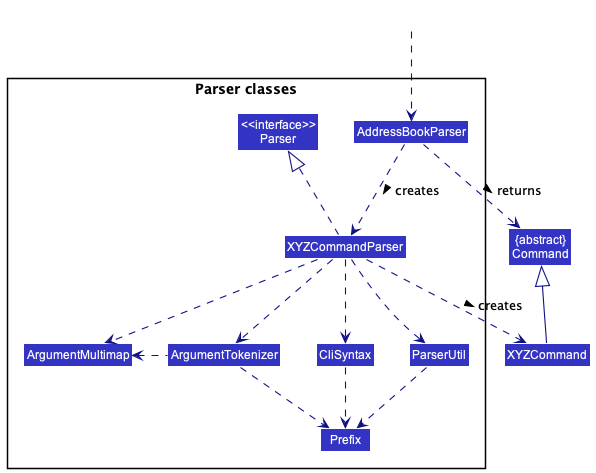
How the parsing works:
- When called upon to parse a user command, the
TeachWhatParserclass creates anXYZCommandParser(XYZis a placeholder for the specific command name e.g.,DeleteStudentCommandParser) which uses the other classes shown above to parse the user command and create aXYZCommandobject (e.g.,DeleteStudentCommand) which theTeachWhatParserreturns back as aCommandobject. - All
XYZCommandParserclasses (e.g.,AddStudentCommandParser,DeleteStudentCommandParser, …) inherit from theParserinterface so that they can be treated similarly where possible e.g, during testing.
Model component
API : Model.java
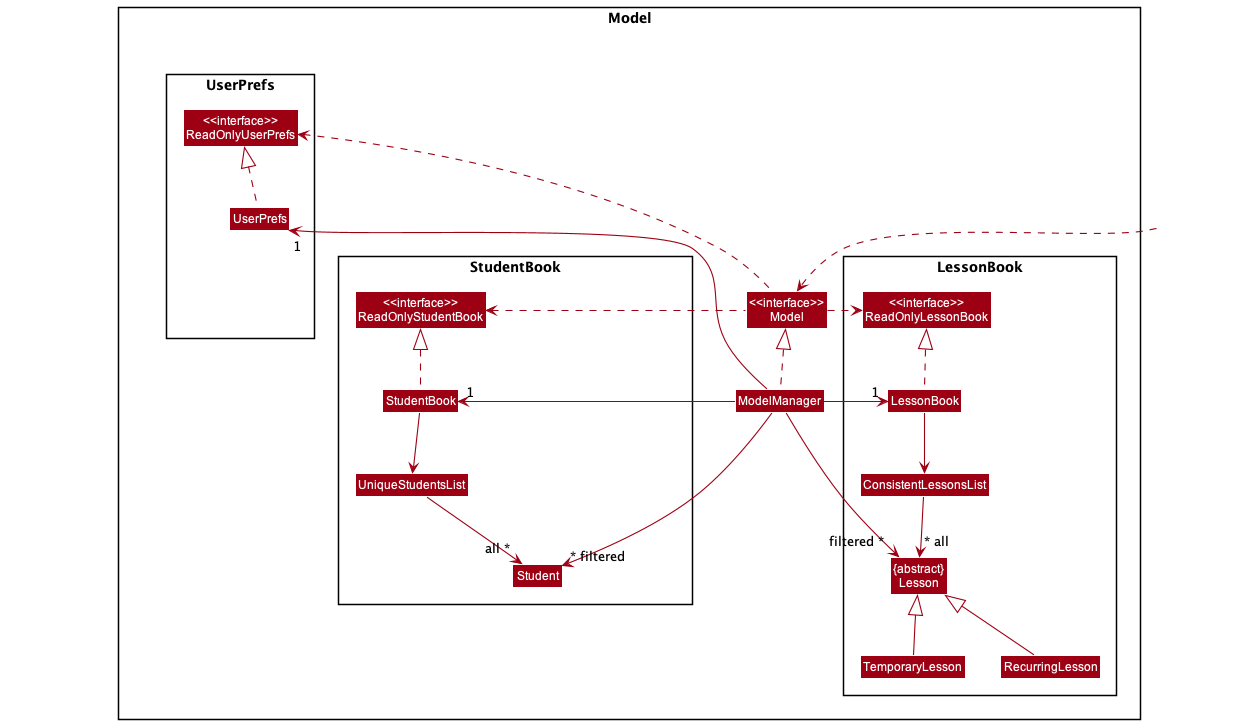
The ModelManager component,
- stores the student book data i.e., all
Studentobjects (which are contained in aUniquePersonListobject). - stores the lesson book data i.e., all
Lessonobjects (which are contained in aConsistentLessonListobject). - stores a
UserPrefobject that represents the user’s preferences.
the ModelManager component also,
- stores the currently ‘selected’
Studentobjects (e.g., results of a search query) as a separate filtered list which is exposed to outsiders as an unmodifiableObservableList<Student>that can be ‘observed’ e.g. the UI can be bound to this list so that the UI automatically updates when the data in the list change. - similarly, it stores the currently ‘selected’
Lessonobjects (e.g., results of a search query) as a separate filtered list which is exposed to outsiders as an unmodifiableObservableList<Lesson>that can be ‘observed’ e.g. the UI can be bound to this list so that the UI automatically updates when the data in the list change.
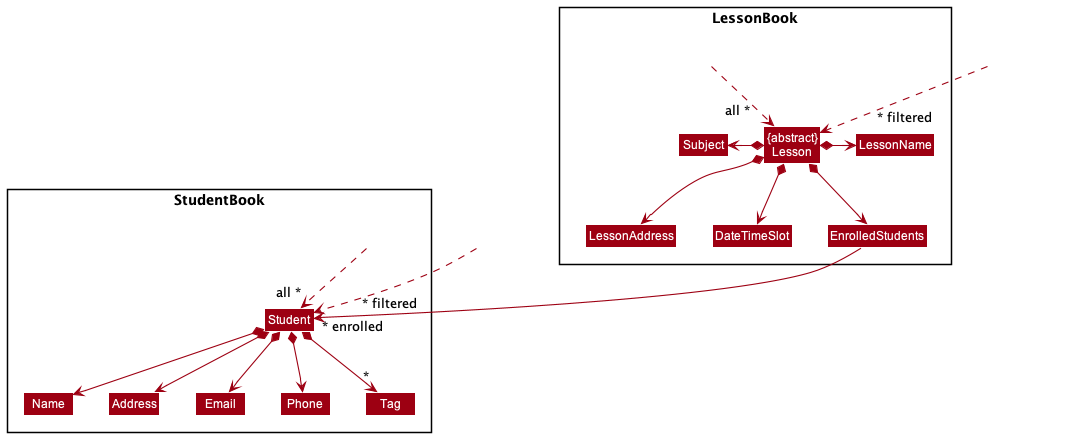
Each Lesson has an association with a list of EnrolledStudents, which contains references to each Student assigned to the lesson.
Storage component
API : StorageManager.java
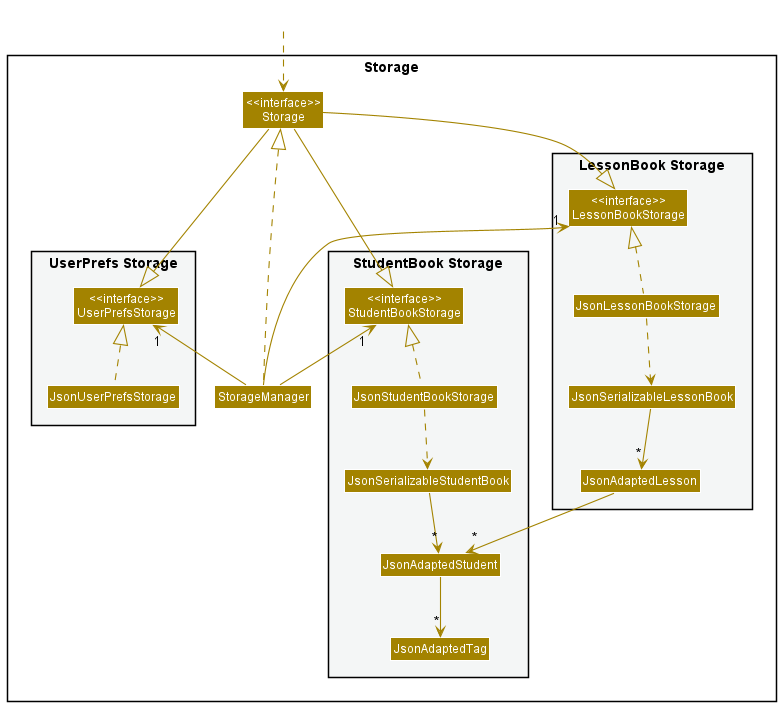
The Storage component
- saves lesson book data, student book data and user preference data in json format, and read them back into the corresponding objects.
- inherits from
LessonBookStorage,StudentBookStorageandUserPrefStorage, which means it can be treated as any one of the three (if only the functionality of one is needed). - depends on some classes in the
Modelcomponent because its job is to save/retrieve objects that belong to theModel.
Common classes
Classes used by multiple components are in the seedu.address.commons package.
Implementation
This section describes some noteworthy details on how certain features are implemented.
Viewing a Lesson or Student’s details
Viewing details of a Lesson or Student on the InfoPanel component in the UI is done through the lesson or
student command.
When the command is entered, the
TeachWhatParser
would parse the given user input and return either a
ViewLessonInfoCommand
or ViewStudentInfoCommand
object, depending on which command was used.
When the Command is executed by Logic, the executed command would make some attribute changes to Model (which holds
the data of the App in memory) and also update the InfoPanel component of the UI with detailed information of the
selected Lesson or Student. A more detailed explanation is shown below.
Given below is an example where a user inputs student 1 as a command to view the details of the first student on the
list.
Step 1: User inputs student 1 into the CommandBox and hits enter.
MainWindow
receives the user input through the MainWindow#executeCommand() method.
MainWindow
then sends the user input to Logic and retrieves the result.
Step 2: Logic parses the user’s input and returns the result
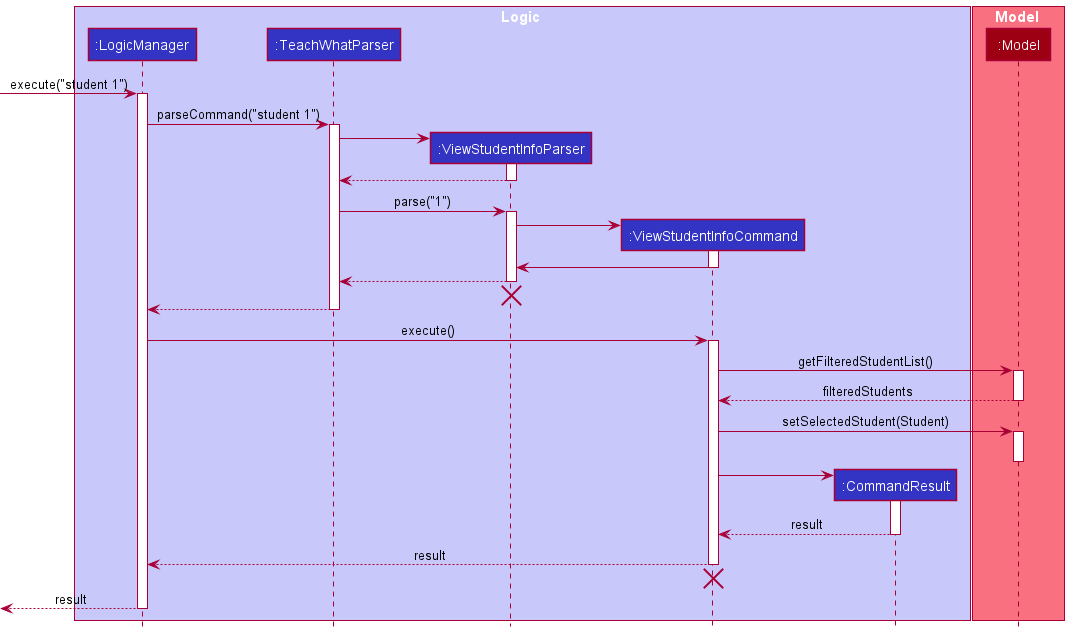
Logic parses the user’s input through multiple Parser classes as shown in the sequence diagram above. User
input is first sent to the TeachWhatParser
where it looks for the main command student. It passes the arguments to
the relevant Command Parser which in this case is
ViewStudentInfoParser.
ViewStudentInfoParser
takes in the provided index and creates a
ViewStudentInfoCommand.
This Command is returned back to LogicManager where it is executed with the ViewStudentInfoCommand#execute() method.
Step 3: Executing the command
As shown in the diagram above, when ViewStudentInfoCommand#execute() is called,
ViewStudentInfoCommand
retrieves the filtered list (the current list shown in the UI) from Model and picks out the selected student based on
the index provided by the user’s input. It then sets ModelManager#selectedStudent using the
ModelManager#setSelectedStudent() method, which will be used by
MainWindow
later on.
ViewStudentInfoCommand
creates a
CommandResult
object, with the parameter infoPanelType = InfoPanelTypes.STUDENT.
InfoPanelTypes
is an enumerator representing the different states of the InfoPanel. This is then returned to LogicManager which
returns it back to MainWindow.
Step 4: Updating the UI
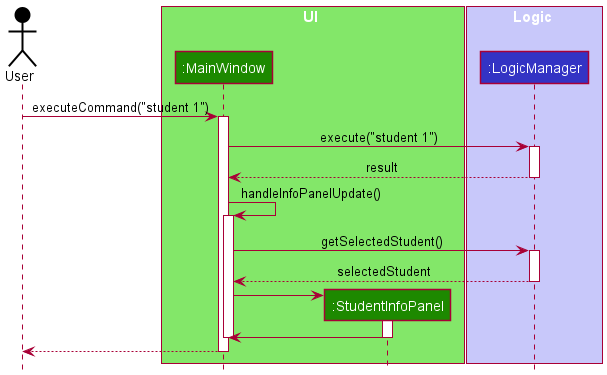
Once
MainWindow
receives the
CommandResult
object, it checks for the CommandResult#updateInfoPanel boolean. If the
boolean is true, it runs the MainWindow#handleInfoPanelUpdate() method which updates the InfoPanel. It does this by
retrieving the selected student from ModelManager#selectedStudent and creates a new
StudentInfoPanel
with the selected student and its details. The newly created
StudentInfoPanel
is shown on the right side of the application.
The execution of the command is complete and the result is shown in the image below, where the right side of the
application is updated with the details of the selected Student.

A similar process is done when using the lesson command but with its corresponding Parser and Command objects.
Add student
Adding a new Student to TeachWhat! is done through the LogicManager. The user input is parsed by the
TeachWhatParser into a Command which is executed by LogicManager#execute().
Given below is an example scenario:
The user wants to add a student that has the following details,
-
name: Samuel -
phone: 64874982 -
email: simp4raiden@gmail.com -
address: 6 Raffles Quay Singapore, 048580 Singapore -
tag: struggling in math -
tag: good in cs
Step 1. The user enters the command
addstudent -n Samuel -p 64874982 -e simp4raiden@gmail.com -a 6 Raffles Quay Singapore, 048580 Singapore -t struggling in math -t good in cs
Step 2. The user input is passed into LogicManager#execute(commandText).
Step 3. LogicManager uses the TeachWhatParser#parseCommand(userInput) to parse the user input.
Step 4. The TeachWhatParser detects the command word addstudent and passes the student details to AddStudentCommandParser#parse(args).
Step 5. The AddStudentCommandParser uses ArgumentMultimap to map the student details into the prefixes name, phone, email, address and tag, and constructs a new Student
which is then used to construct and return AddStudentCommand.
- Constraints
- Multiple
tagprefixes can be given but only onename,phone,emailandaddresscan be given. -
All the prefixes are optional except for
nameandphoneParseExceptionwill be thrown if the constraints are violated
- Multiple

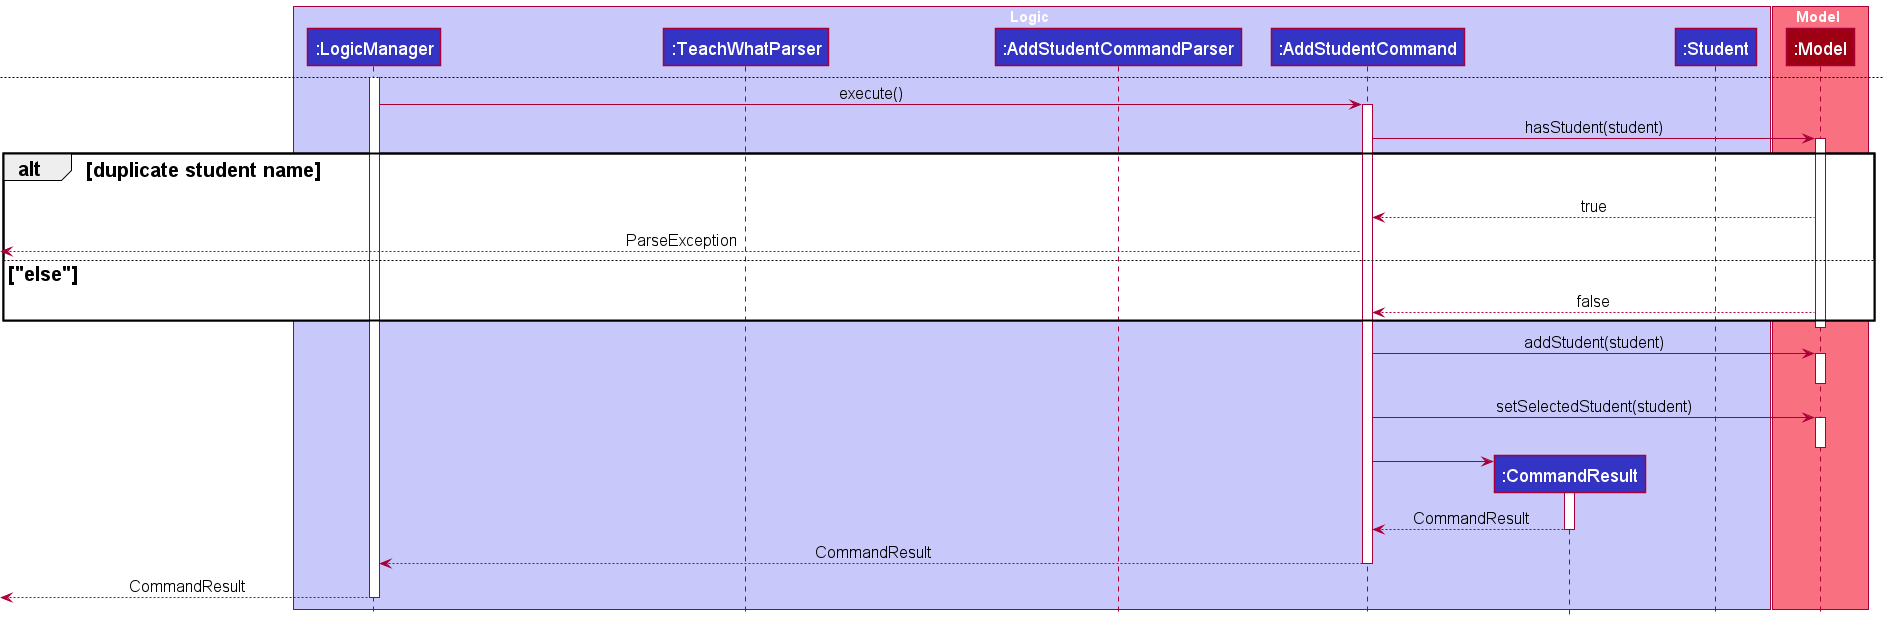
Step 6. The LogicManager then executes the AddStudentCommand and the Student is added to the Student Book if another Student with the same name does not already exist.
The following sequence diagram shows how the add student command works.
Design Considerations
Choice 1
Required prefixes: name and phone
Optional prefixes: email, address and tag
Advantages: This improves user experience as the tutor may not want to keep track of them.
Disadvantages: It may cause some students to have email address and some to not have them. This may cause inconsistencies.
Choice 2
Required prefixes: name, phone and email
Optional prefixes: address and tag
Advantages: This improves user experience as the tutor may not want to keep track of addresses.
Disadvantages: It requires the tutor to know the email address as well for all his students.
We decided on Choice 1 because it felt tedious for the user to ask for the email address of every student. This split of required and optional fields allows us to maintain the minimal amount of information required by a tutor and improve user experience by improving typing speed as the user does not have to enter every field.
Delete student or lesson
Deleting a Student or Lesson to TeachWhat! is done through the LogicManager. The user input is parsed by the
TeachWhatParser into a Command which is executed by LogicManager#execute().
Given below is an example scenario:
The user wants to delete a student that is of index 1 on the viewable student list,
Step 1. The user enters the command rml 1
Step 2. The user input is passed into LogicManager#execute(commandText).
Step 3. LogicManager uses the TeachWhatParser#parseCommand(userInput) to parse the user input.
Step 4. The TeachWhatParser detects the command word rml and passes the student details to DeleteLessonCommandParser#parse(args).
Step 5. The DeleteLessonCommandParser uses ParserUtil#parseIndex(oneBasedIndex) to parse the one-based index of the lesson to be deleted into a zero-based Index. This is used to construct a new
DeleteLessonCommand which it then returns.
- Constraints
-
ParserUtil#parseIndex(oneBasedIndex)rejects non-positive integers (i <= 0) -
ParserUtil#parseIndex(oneBasedIndex)rejects values that are not of typejava.lang.IntegerParseExceptionwill be thrown if the constraints are violated
-
Step 6. The LogicManager then executes the DeleteLessonCommand and the Lesson is removed from the Lesson Book.
- Constraint
- The
IndexinDeleteStudentCommandmust not be greater than or equal to the size of the viewable student list.ParseExceptionwill be thrown if the constraints are violated
- The

Add temporary/recurring lesson
Adding a new Lesson to TeachWhat! follows a process that is similar to adding a new Student, with the following key differences,
- the
TeachWhatParserdetects the command wordaddlessonand passes the lessons details toAddLessonCommandParser#parse - the
AddLessonCommandParserthen maps the arguments into the prefixeslessonName,subject,lessonAddress,date,time,recurring,hoursandminutes - after which it constructs a new
Lessonand passes it to theAddLessonComand
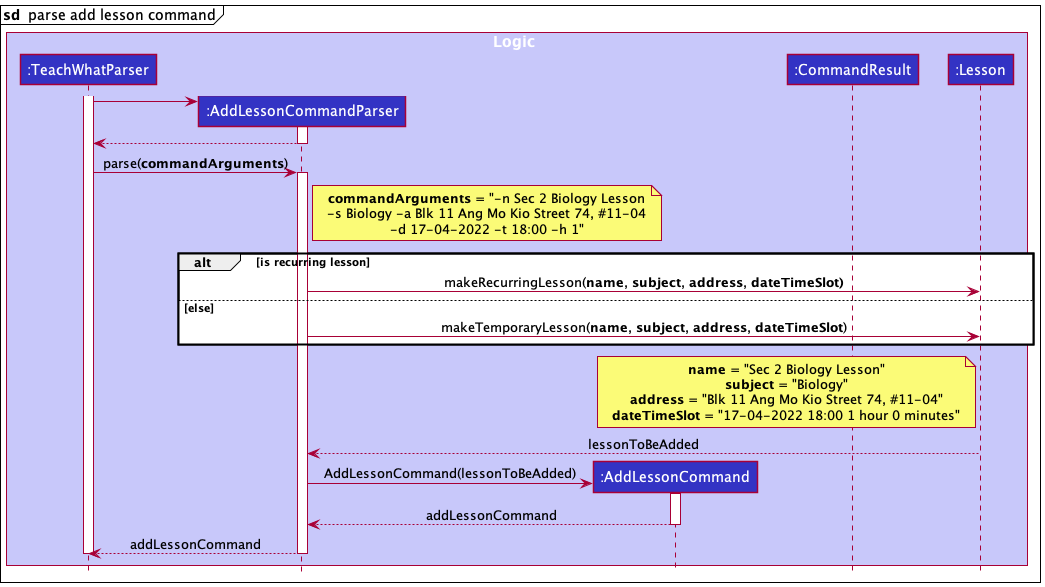
The following sequence diagram shows how the add lesson operation works when a user enters the following command:
addlesson
-n Sec 2 Biology Lesson
-s Biology -a Blk 11 Ang Mo Kio Street 74, #11-04
-d 17-04-2022 -t 18:00 -h 1
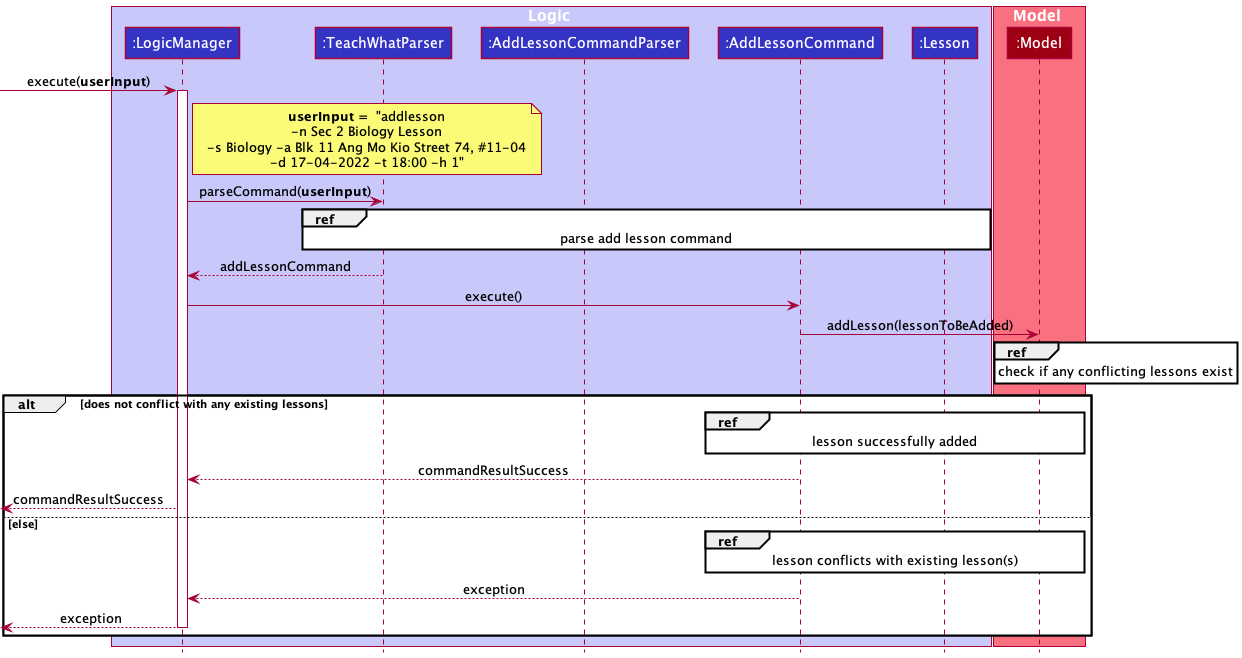
The following sequence diagram shows,
- how an
AddLessonCommandis instantiated from the given user input - how a new instance of a
TemporaryLessonorRecurringLessonis instantiated from the arguments given by the user
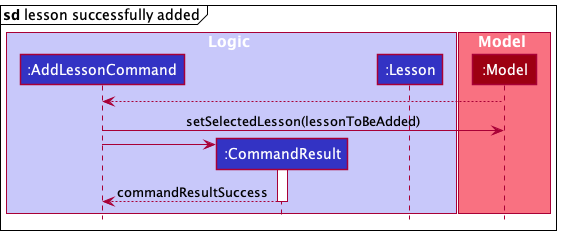
The following sequence diagram shows how AddLessonCommand
- sets the newly added lesson as the selected lesson in the UI through
Model
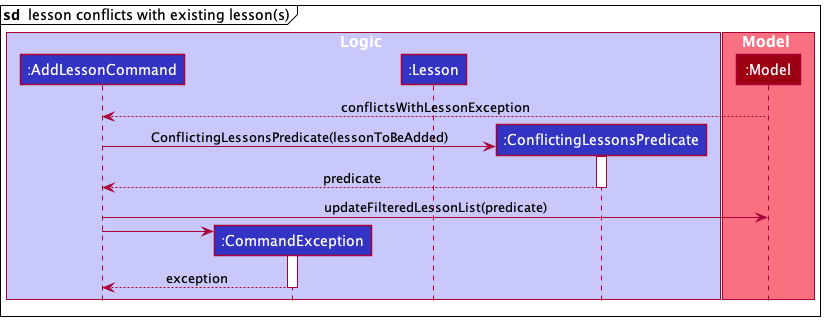
The following sequence diagram shows how AddLessonCommand
- updates the UI to show a list of conflicting lessons by updating the filtered lesson list through
Modelusing an instance ofConflictingLessonsPredicate
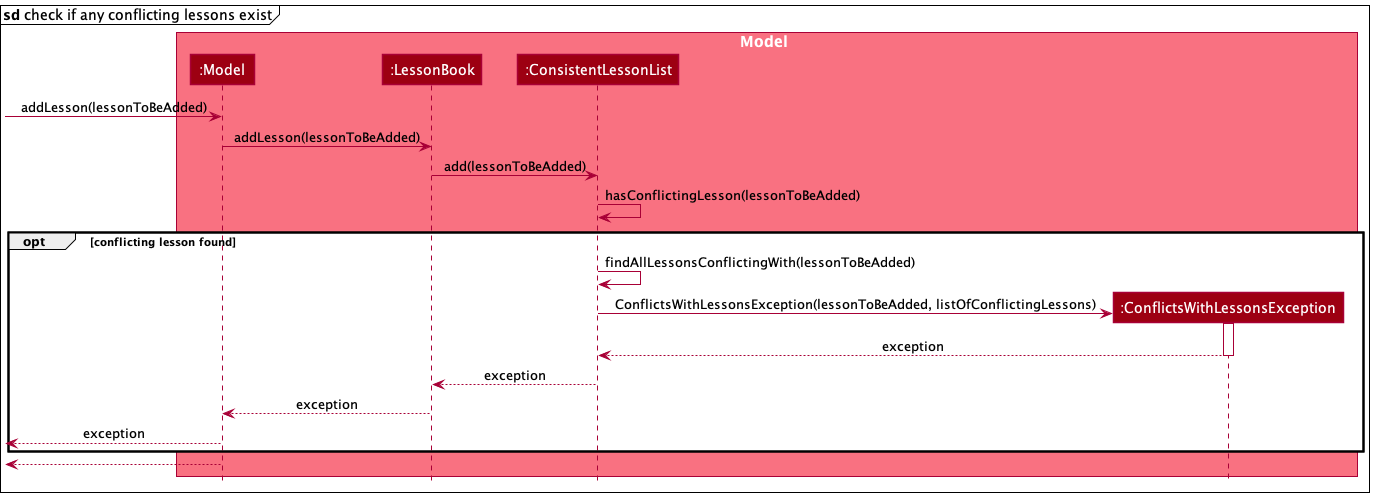
Determining if a lesson clashes with any existing lessons
When a user requests to add a new lesson to the list, it is important to check that the new lesson does not clash with any existing lessons in the list.
This is done by the ConsistentLessonList class, which enforces consistency between existing lessons stored in the list.
A list of lessons is considered consistent when no lessons clash with each another. In particular, the following two conditions are enforced by the ConsistentLessonList:
- no two temporary lessons should have overlapping timeslots (ie: a lesson should not start when another lesson has not ended)
- no recurring lesson should have overlapping timeslots with any temporary lesson or recurring lesson that falls on the same weekday as it
This is done with the method ConsistentLessonList#hasConflictingLesson(), which takes in the Lesson to be added and
- goes through the list and compares each existing
Lessonwith it - and returns true if any existing lessons clashes with it
The following sequence diagram shows how this is done:
Assign student to lesson
The feature assigns a Student to a Lesson. The AssignCommand class
extends the Command and overwrites the Command#execute() method.
Using the Model object passed in as an argument of the AssignCommand#execute()
method, the following methods are invoked in the AssignCommand#execute() method:
-
Model#updateAssignment()- adds
Studentto theenrolledStudentsattributeLesson - adds
Lessonto theenrolledLessonsattribute of theStudent
- adds
-
Model#setSelectedStudent()- sets theselectedStudentattribute ofModelto theStudentthat is being assigned. This is done to display theStudentdetails in theMainWindow#InfoPanel.
The AssignCommand#execute() method returns a CommandResult upon a
successful assignment.
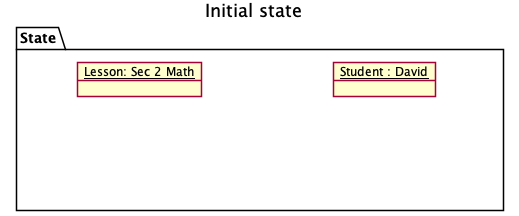
Given below is an example usage scenario on how the assign command works.
Step 1: The user launches the application and executes the following
-
addlesson -n Sec 2 Math...which adds aLessonnamed “Sec 2 Math”. -
addstudent -n David...which adds aStudentnamed “David”.
Step 2: The user executes the following to find the respective IDs of the Student and Lesson.
-
listlessonscommand to see that theLessonnamed “Sec 2 Math” has aLESSON_IDof 1. -
liststudentscommand to see that theStudentnamed “David” has aSTUDENT_IDof 1.
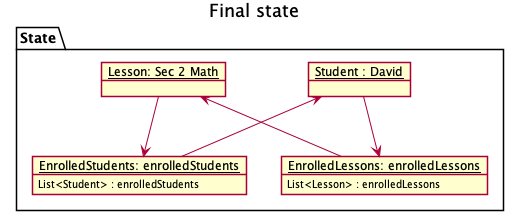
Step 3: The user executes the command assign -s 1 -l 1. The command does the following:
- adds
Student“David” to theenrolledStudentsattribute of theLesson“Sec 2 Math”. - adds
Lesson“Sec 2 Math” to theenrolledLessonsattribute of theStudent“David”.
The following sequence diagram shows how the assign operation works.
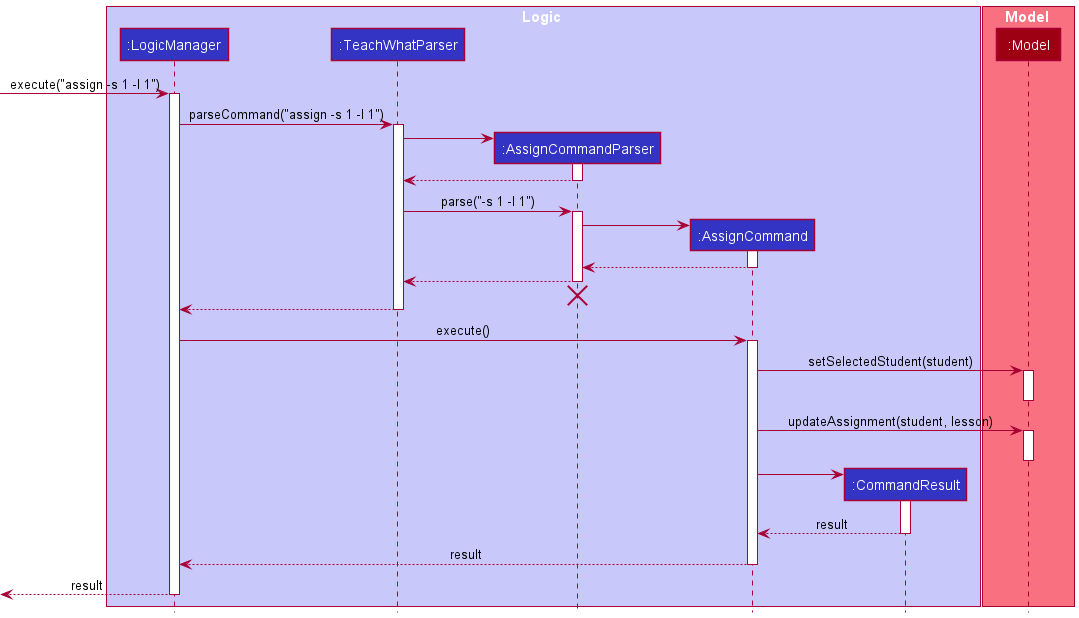
Note: The lifeline for AssignCommandParser should end at the destroy marker (X) but due to a limitation of PlantUML, the lifeline reaches the end of diagram.
Help feature
The feature shows a table of commands with a short description, the command words and their shortcuts. If the user wants to know more about the commands, there is a hyperlink to the user guide.
This feature is implemented in the HelpWindow.
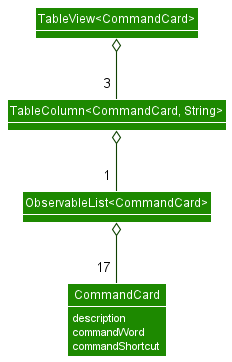
All commands are stored as CommandCard that is used by a TableView<CommandCard> to display the information.
The TableView<CommandCard is made up of three TableColumn<CommandCard> corresponding to each field of a CommandCard.
A CommandCard contains the description, commandWord and commandShortcut fields.
These are used by TableColumn<CommandCard> to create the columns of each corresponding field.
Given below is a class diagram of TableView<CommandCard>.
Design considerations
The CommandCard class became a nested class because there were no other features that would be implemented that need to use it. Only the HelpWindow requires it,
thus, it was made as a nested class.
Command Shortcuts
Command shortcuts were implemented for commands that have a lengthy COMMAND_WORD. This was done by adding another field SHORTENED_COMMAND_WORD.
Design Considerations
The shortcuts were implemented in TeachWhatParser by using fallthroughs in a switch-case block. This was done because the code would be more readable and
it would be easier to implement.
There was some consideration over whether we should use if-else statements instead but this was rejected as it would cause the code to be difficult to read compared to
case statements.
There was also some debate about using a command list in each Command to hold both the command word and shortcut if it exists.
This would make adding more commands trivial as TeachWhatParser would check the command list in each command.
However, this was rejected because it would take a lot of time to implement and the current iteration would only be using at most two command words (COMMAND_WORD and SHORTENED_COMMAND_WORD).
If we had a feature that allows the user to create custom command words for each command then only would it be worthwhile to implement but we did not plan on adding that feature.
Documentation, logging, testing, configuration, dev-ops
Appendix: Requirements
Product scope
Target user profile:
- is a private tutor
- has multiple students and lessons
- can type fast
- skilled at using the command line
Value proposition:
If a tutor has many students, it may be difficult to keep track of all of the students and the rates offered to each of them. TeachWhat! solves this issue by helping tutors manage their schedule, students and income more efficiently.
User stories
Priorities: High (must have) - * * *, Medium (nice to have) - * *, Low (unlikely to have) - *
| Priority | As a … | I want to … | So that I can… |
|---|---|---|---|
* * * |
user | add my student’s information | keep track of their information |
* * * |
user | edit my student’s information. | keep their information up-to-date |
* * * |
user | delete students and their details | reduce clutter of old students and keep their privacy intact |
* * * |
user | add lessons to the list | keep track of lesson schedule |
* * * |
user | edit lessons | keep my schedule up-to-date |
* * * |
user | delete lessons | clear old lessons |
* * * |
user | assign students to the lesson | track which students are attending the lesson |
* * * |
user | specify the type of lesson when creating one | know if a lesson is permanent or a temporary lesson |
* * |
a new user | clear and reset my entire list of lessons and students | add actual data after testing the program out |
* * |
a new user | refer to commands in the help page | learn how to use the application without opening the user guide |
* * |
a experienced user | use shorter command words | type and execute commands faster |
* * |
a experienced user | access my previous commands | easily amend or refer to them |
* |
a new user | have a hyperlink on the help page to the user guide | easily access the user guide page |
Use cases
Add a temporary lesson
System: TeachWhat!
Use case: UC1 - Add a temporary lesson
Actor: User
MSS
- User adds a temporary lesson with a specified name, subject, address, date, time and duration.
- TeachWhat! updates the list of lesson. Use case ends.
Extensions
- 1a. User did not provide any name.
- 1a1. TeachWhat! shows an error message.
Use case resumes at step 1.
- 1a1. TeachWhat! shows an error message.
- 1b. User did not provide a date or date has invalid format.
- 1b1. TeachWhat! shows an error message.
Use case resumes at step 1.
- 1b1. TeachWhat! shows an error message.
- 1c. User did not provide a starting time or starting time has invalid format.
- 1c1. TeachWhat! shows an error message.
Use case resumes at step 1.
- 1c1. TeachWhat! shows an error message.
- 1d. User did not provide the duration of lesson or duration of lesson has invalid format.
- 1d1. TeachWhat! shows an error message.
Use case resumes at step 1.
- 1d1. TeachWhat! shows an error message.
- 1e. User already has existing lesson(s) overlapping with the specified starting, ending time and date.
- 1e1. TeachWhat! shows an error message and displays a list of such overlapping lesson(s)
Use case resumes at step 1.
- 1e1. TeachWhat! shows an error message and displays a list of such overlapping lesson(s)
Add a recurring lesson
System: TeachWhat!
Use case: UC2 - Add a recurring lesson
Actor: User
MSS
- User adds a recurring lesson with a specified name, subject, address, date, time and duration.
- TeachWhat! updates the list of lesson. Use case ends.
Extensions
- 1a. User did not provide any name.
- 1a1. TeachWhat! shows an error message.
Use case resumes at step 1.
- 1a1. TeachWhat! shows an error message.
- 1b. User did not provide a date or date has invalid format.
- 1b1. TeachWhat! shows an error message.
Use case resumes at step 1.
- 1b1. TeachWhat! shows an error message.
- 1c. User did not provide a starting time or starting time has invalid format.
- 1c1. TeachWhat! shows an error message.
Use case resumes at step 1.
- 1c1. TeachWhat! shows an error message.
- 1d. User did not provide the duration of lesson or duration of lesson has invalid format.
- 1d1. TeachWhat! shows an error message.
Use case resumes at step 1.
- 1d1. TeachWhat! shows an error message.
- 1e. User already has an existing lesson overlapping with the specified starting, ending time and date.
- 1e1. TeachWhat! shows an error message and displays a list of such overlapping lesson(s)
Use case resumes at step 1.
- 1e1. TeachWhat! shows an error message and displays a list of such overlapping lesson(s)
Delete a lesson
System: TeachWhat!
Use case: UC3 - Delete a lesson
Actor: User
MSS
- User requests to list lessons
- TeachWhat! shows a list of lessons
- User requests to delete a specific lesson in the list
- TeachWhat! deletes the lesson
Use case ends.
Extensions
-
2a. The list is empty.
Use case ends. -
3a. The given index is invalid.
- 3a1. TeachWhat! shows an error message.
Use case resumes at step 3.
- 3a1. TeachWhat! shows an error message.
Assign a student to a lesson
System: TeachWhat!
Use case: UC4 - Assign a student to a lesson
Actor: User
MSS
- User requests to list students
- TeachWhat! shows a list of students
- User requests to list lessons
- TeachWhat! shows a list of lessons
- User selects the lesson to assign the student to
- TeachWhat! assigns the student to the lesson. Use case ends.
Extensions
-
2a. The list of students is empty.
Use case ends. -
4a. The list of lessons is empty.
Use case ends. -
5a. The given index of student or lesson is invalid.
- 5a1. TeachWhat! shows an error message.
Use case resumes at step 5.
- 5a1. TeachWhat! shows an error message.
Delete a student
System: TeachWhat!
Use case: UC5 - Delete a student
Actor: User
MSS
- User requests to list students
- TeachWhat! shows a list of students
- User requests to delete a specific student in the list
- TeachWhat! deletes the student
Use case ends.
Extensions
-
2a. The list is empty.
Use case ends. -
3a. The given index is invalid.
- 3a1. TeachWhat! shows an error message.
Use case resumes at step 3.
- 3a1. TeachWhat! shows an error message.
Non-Functional Requirements
- TeachWhat! able to run on all mainstream OS that has Java 11 or above installed
- Should be able to hold up to 1000 students and lessons without a noticeable sluggishness in performance for typical usage
- A user with above average typing speed for regular English text (i.e. not code, not system admin commands) should be able to accomplish most of the tasks faster using commands than using the mouse
- A new user should be able to pick up on how to use TeachWhat! within 10 minutes
- TeachWhat! must boot up within 5 seconds on a device that is under normal load (i.e. not running cpu intensive applications in the background).
Glossary
- Mainstream OS: Windows, Linux, Unix, OS-X
- Command Line: A text interface for your computer.
Appendix: Instructions for manual testing
Given below are instructions to test the app manually.
First launch and saving window preferences
When launching TeachWhat! for the first time, it should populate the list with sample data. Furthermore, it should save window preferences when you close the program.
- Launching the app
- Refer to the Quick Start section of the User Guide on setting up TeachWhat!.
- Launch the program using the Terminal with this command
java -jar TeachWhat.jar - Test Case: First launch
Expected: Sample data should populate the lists. A data folder along with config.json and preferences.json should be created in the current directory.
- Saving window preferences
- Launch TeachWhat!.
- Resize the window to your preference.
- Close the program, either by using the
exitcommand or closing the window. - Test Case: Restoring window preferences
Expected: When relaunching the program, the window position and size should be restored from where you previously left off.
Adding a lesson / Viewing a lesson’s details
TeachWhat! allows you to store details of a lesson and view it back later on.
- Test case 1: Adding a temporary lesson
- Condition: No other lesson should have a conflicting timeslot.
- Enter the command
addlesson -n Sec 2 Biology Group Tuition -s Biology
-a Blk 11 Ang Mo Kio Street 74, #11-04
-d 19-12-2022 -t 18:00 -h 2 -m 15
. - Expected: The lesson should be added to the list, with its details shown on the card.
- Test case 2: Adding a recurring lesson
- Condition: No other lesson should have a conflicting timeslot.
- Enter the command
addlesson -r -n Sec 2 Chemistry Group Tuition -s Biology -a Blk 11 Ang Mo Kio Street 74, #11-04 -d 20-12-2022 -t 18:00 -h 2 -m 15 - Expected: The lesson should be added to the list, with its details shown on the card.
- Test case 3: Adding a conflicting lesson
- Condition: Should have another class with a conflicting timeslot.
- Enter the command
addlesson -n Sec 2 Mathemathics Group Tuition -s Biology -a Blk 11 Ang Mo Kio Street 74, #11-04 -d 19-12-2022 -t 19:00 -h 2 -m 15 - Expected: In this example, the entered lesson conflicts with the command entered in Test Case 1. TeachWhat! should give you a warning that an existing lesson has a conflicting timeslot. The new lesson will not be added to the list. The list should also be filtered to show you the conflicting lessons.
- Test case 4: Viewing a temporary lesson’s details
- Condition: An existing temporary lesson should be in the list.
- Enter the command
listlessons. - Assuming an existing temporary lesson has an index of 1, enter the command
lesson 1. - Expected: The details of that temporary lesson should be shown on the right.
- Test case 5: Viewing a recurring lesson’s details
- Condition: An existing recurring lesson should be in the list.
- Enter the command
listlessons. - Assuming an existing recurring lesson has an index of 2, enter the command
lesson 2. - Expected: The details of that recurring lesson should be shown on the right. A recurring lesson is denoted by the
green tag which is labelled
recurring.
![]() Note that:
Note that:
The list of lessons displayed is sorted by the next upcoming lesson date.
![]() Input constraints:
Input constraints:
- Lesson name must be alphabetic.
- Lesson name is limited to 50 characters.
- Subject is limited to 50 characters.
- Address is limited to 100 characters.
Adding a student / Viewing a student’s details
TeachWhat! allows you to store details of a student and view it back later on.
- Test case 1: Adding a student
- Enter the command
addstudent -n John Doe -p 98765432 -e johnd@example.com -a 311, Clementi Ave 2, #02-25 -t friends -t owesMoney. - Expected: The student should be added to the list, with its details shown on the card.
- Enter the command
- Test case 2: Viewing a student’s details
- Condition: An existing student should be in the list.
- Assuming an existing student has an index of 1, enter the command
student 1. - Expected: The details of that student should be shown on the right.
![]() Input constraints:
Input constraints:
- Student name must be alphanumeric.
- Student name is limited to 50 characters.
- Phone number is limited to 20 digits.
- Address is limited to 100 characters.
- Email address is limited to 100 characters.
- Email address must have 2 characters after the @ symbol.
Deleting a student
This command requires you to have at least one existing student.
- If there are no students, refer to the
addstudentuser guide section to add a student.
- Test case 1: Delete
studentof index 1 on the viewable student list.- Execute
liststudentsto ensure that your lists includes all students. - Execute
rmstudent 1or the shortcutrms 1. - Expected: The student of index 1 on the viewable student list is deleted.
- Execute
- Test case 2: Delete
studentwith invalid index- Execute
liststudentsto ensure that your lists includes all students. - Execute
rmstudent 0or the shortcutrms 0. - Expected: An invalid index error message is shown.
- Note: An invalid index is any value that is not a positive integer of type
java.lang.Integer. (e.g. if index is greater thanInteger.MAX_VALUEor less than 0 or is not of typejava.util.Integer)
- Note: An invalid index is any value that is not a positive integer of type
- Execute
- Test case 3: Delete
studentwith out-of-bounds index- Execute
liststudentsto ensure that your lists includes all students. (Ensure there are only two students) - Execute
rmstudent 3or the shortcutrms 3. - Expected: An out-of-bounds error message is shown.
- Note: An out-of-bounds index is a positive integer of type
java.lang.Integerbut is a greater than the viewable student list.
- Note: An out-of-bounds index is a positive integer of type
- Execute
Assigning a student
This command requires you to have at least one existing student and lesson.
- If there are no students, refer to the
addstudentuser guide section to add a student. - If there are no lessons, refer to the
addlessonuser guide section to add a lesson.
- Test case 1: Assigning
studenttolessonsuccessfully- Ensure that
studentwith<STUDENT_ID>1 is not already assigned to thelessonof<LESSON_ID>1. - Execute
liststudentsandlistlessonsto ensure that your lists includes all students and lessons. - Execute the command
assign -s 1 -l 1. This will assign the firststudentin the list to the firstlessonin the list. - Expected: The details of the
lessonwill be displayed on the right info panel, and you should see thestudentthat you just assigned in the Students list of thelesson.
- Ensure that
- Test case 2: Assigning
studenttolessonunsuccessfully- Following Testcase 1, execute
listlessonsandliststudentsto ensure that your lists includes all existing students and lessons. - Execute the command
assign -l 1 -s 1. - Expected: An error message will be displayed saying that the student is already enrolled in the lesson.
- Following Testcase 1, execute
Unassigning a student
This command requires you to have at least one existing student and lesson.
- If there are no students, refer to the
addstudentuser guide section to add a student. - If there are no lessons, refer to the
addslessonuser guide section to add a lesson.
- Test case 1: Unassigning
studentfromlessonsuccessfully- Ensure that
studentwith<STUDENT_ID>1 is already assigned to thelessonof<LESSON_ID>1.- If not, follow the Assigning a student: Testcase 1
- Execute
liststudentsandlistlessonsto ensure that your lists includes all students and lessons. - Execute the command
unassign -s 1 -l 1. This will unassign the firststudentin the list from the firstlessonin the list. - Expected: The details of the
studentwill be displayed on the right info panel, and you should not see thelessonthat you just unassigned in the Lessons list of thestudent.
- Ensure that
- Test case 2: Unassigning
studentfromlessonunsuccessfully- Following Testcase 1, execute
listlessonsandliststudentsto ensure that your lists includes all existing students and lessons. - Execute the command
unassign -l 1 -s 1. - Expected: An error message will be displayed saying that the student is not enrolled in the lesson.
- Following Testcase 1, execute
Saving data
Missing data files
When using TeachWhat! (or any program), there is always a possibility that data-files would go missing. This could either be due to errors caused by the operating-system, or by the user deleting the data-files.
To simulate this scenario, follow the steps below:
- Create an empty folder, and place the
TeachWhat.jarinside it. - Start the program by following the quick-start instructions in the User Guide.
- Exit the program by entering the
exitcommand in the command-box.- At this point, you should see that some new files and folders have been created in the folder.
- Open the folder named “data”, and delete both “lessonbook.json” and “studentbook.json”
- At this point, the “data” folder would be empty.
- Start the program again.
- You should see that the program would start with the default sample list of lessons and students.
As seen in the steps above, the expected-behaviour for missing data-files is that TeachWhat! would simply create another new data-file pre-populated with sample data (as if the user is using the program for the first time.)
Corrupted data-files
When using TeachWhat! (or any program), there is always a possibility that data-files would become corrupted. This could either be due to errors caused by the operating-system, or by the user manually-editing the data-files.
To simulate this scenario, follow the steps below:
- Create an empty folder, and place the
TeachWhat.jarinside it. - Start the program by following the quick-start instructions in the User Guide.
- Exit the program by entering the
exitcommand in the command-box.- At this point, you should see that some new files and folders have been created in the folder.
- Open the folder named “data”, and open the data-file named “lessonbook.json” using a text-editor of your choice.
- To simulate the file becoming corrupted, you may remove or add some items into the JSON file.
- In this case, we can simply remove the opening square-bracket from the JSON file, rendering it unreadable, like so:
Before change
{
  "lessons" : [ {                                   // <---------- to remove [
    "lessonName" : "Make up lesson for George",
    "subject" : "Geography",
    "dateTimeSlot" : {
      "dateOfLesson" : "5-1-2022",
      "durationHours" : "2",
      "durationMinutes" : "0",
      "startTime" : "17:50"
    },
    "isRecurring" : false,
    "assignedStudents" : [ ],
    "lessonAddress" : "Blk 47 Tampines Street 20, #17-35"
  }
  // ......
}
After change
{
  "lessons" : {                                   // <---------- removed [
    "lessonName" : "Make up lesson for George",
    "subject" : "Geography",
    "dateTimeSlot" : {
      "dateOfLesson" : "5-1-2022",
      "durationHours" : "2",
      "durationMinutes" : "0",
      "startTime" : "17:50"
    },
    "isRecurring" : false,
    "assignedStudents" : [ ],
    "lessonAddress" : "Blk 47 Tampines Street 20, #17-35"
  }
  // ......
}
- Start the program again.
- You should see that the program would start with an EMPTY list of lessons and students.
As seen in the steps above, the expected-behaviour for corrupted data-files is that TeachWhat! would simply overwrite both “lessonbook.json” and “studentbook.json” with an empty list.