TeachWhat! User Guide
TeachWhat! is a desktop app for tutors to manage their schedule, students and lessons, optimized for use via a Command Line Interface (CLI) while still having the benefits of a Graphical User Interface (GUI). If you can type fast, TeachWhat! can get your tuition management tasks done faster than traditional GUI apps.
- Quick start
-
Features
- Viewing a student
- Viewing a lesson
- Viewing all students
- Viewing all lessons
- Adding a student
- Editing a Student
- Deleting a student
- Adding a lesson
- Editing a Lesson
- Deleting a lesson
- Assigning a student to a lesson
- Unassigning a student to a lesson
- Finding a Student
- Finding a Lesson
- Clearing all entries
- Help
- Viewing previous commands
- Exit
- FAQ
- Command summary
Quick start
-
Ensure you have Java
11or above installed in your Computer. -
Download the latest
TeachWhat.jarfrom here. -
Copy the file to the folder you want to use as the home folder for your LessonBook.
-
To start TeachWhat!
| OS | How to start TeachWhat! |
|---|---|
| Windows | Double-click the TeachWhat jar file. |
| Mac | On Terminal, go to the directory where the TeachWhat jar file is and do java -jar TeachWhat.jar
|
- The GUI similar to the one shown below should appear in a few seconds.
Note how the app contains some sample data.
-
Type the command in the command box and press Enter to execute it. e.g. Execute
helpto open the help window.
Some example commands you can try:-
listlessons: Lists all lessons. -
liststudents: Lists all students. -
student <STUDENT_ID>: Displays the details of the student with the providedSTUDENT_ID. -
exit: Exits the app.
-
-
Refer to the Features below for details of each command.
Features
![]() Notes about the command format:
Notes about the command format:
-
Words in
<UPPER_CASE>are the parameters to be supplied by the user.
- e.g. in
addstudent -n <NAME>,<NAME>is a parameter which can be used asaddstudent -n John Doe.
- e.g. in
-
Words in
[SQUARE BRACKETS]are parameters that are optional and supplied by the user.- e.g. in the command
editstudent INDEX [-n NAME] [-p PHONE]...,[-n NAME]and[-p PHONE]are optional parameters.
- e.g. in the command
-
Parameters can be in any order.
- e.g. if the command specifies
-n <LESSON_NAME> -d <DATE/START_DATE> -t <START_TIME>,
-d <DATE / START_DATE> -t <START_TIME> -n <lesson_NAME>is also acceptable.
- e.g. if the command specifies
-
Where
<STUDENT_ID>and<LESSON_ID>are mentioned, they are with referring to the index number of the student or lesson in the viewable lists.- eg. If a
findcommand is used, and the viewable list changes to a filtered one,<STUDENT_ID>and<LESSON_ID>would refer to the index in the new viewable list.
- eg. If a
-
Duplicate prefixes are not allowed unless explicitly stated.
- e.g.
assign -s 1 -l 1 -l 2is not allowed as there are two-lprefixes present in the command.
- e.g.
- Where
<START_TIME>is required, the application requires the 24-hour time format.- e.g. 6pm would be 18:00
- When a
<DATE>needs to be specified, it should have the formatDD-MM-YYYY.- e.g. 21st March 2022 should have entered as
21-03-2022.
- e.g. 21st March 2022 should have entered as
- In each Feature description, the command word section will tell you what the command words are for each command. You may see more than one command word for a command, the second one being the shorter command for more advanced users.
- Integer refers to a maximum value of 2147483647.
Viewing a student
Displays the details for the student with the specified student ID.
Command word: student
Format: student <STUDENT_ID>
Examples: student 3 displays the details of the student with STUDENT_ID of 3.
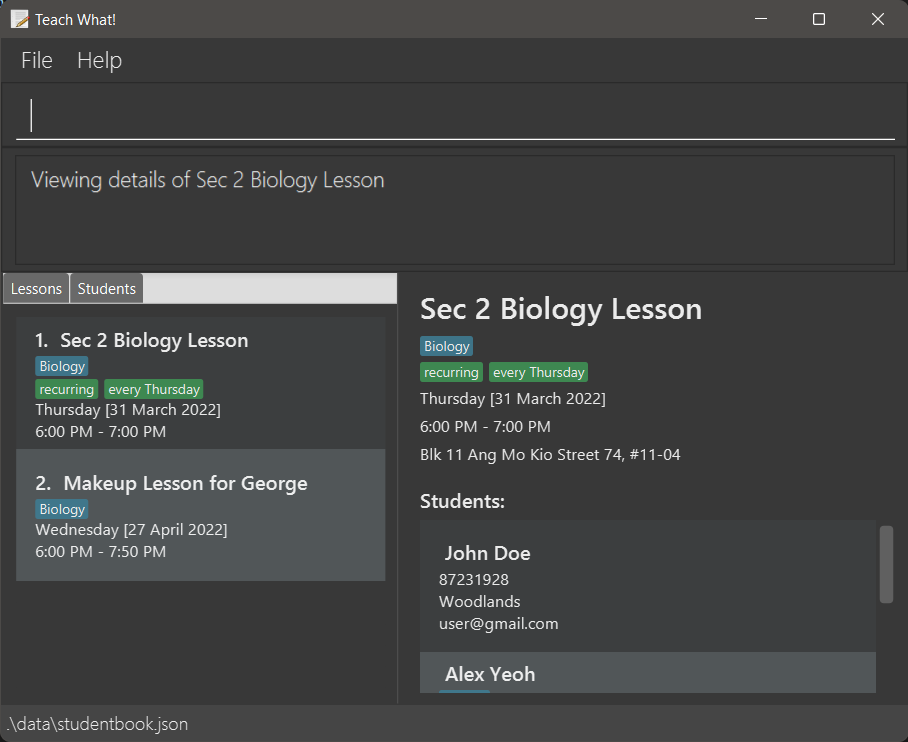
Viewing a lesson
Displays the details for the lesson with the specified lesson ID.
Command word: lesson
Format: lesson <LESSON_ID>
Example: lesson 3 displays the details of the lesson with LESSON_ID of 3.
Viewing all students
Command word: liststudents / ls
Example: liststudents would display a list of all the students that a tutor has.
Viewing all lessons
Command word: listlessons / ll
Example: listlessons would display a list of all the lessons that a tutor has.
Adding a student
Adds a student to TeachWhat!
Command word: addstudent / as
Format: addstudent -n <NAME> -p <PHONE_NO> [-e EMAIL] [-a ADDRESS] [-t TAG]
Example: addstudent -n James -p 999 -e jamesboyo@gmail.com -a 34 Lor 11 Geylang -t hardworking -t small
Adds a student with the following attributes:
- name: James
- phone: 999
- email: jamesboyo@gmail.com
- address: 34 Lor 11 Geylang
- tags: hardworking, small
![]() Note that:
Note that:
- The address, email and tag are optional and can be omitted so that the tutor only keeps the most vital information which is the student’s name and phone number.
- There can be multiple tags assigned to one student, as demonstrated in the example above.
- Student name cannot contain all numbers.
- Student name is limited to 50 alphanumeric characters with spaces allowed.
- Phone number is limited to 20 digits.
- Address is limited to 100 characters.
- Email is limited to 100 characters.
- Tags are limited to 30 alphanumeric characters with no spaces allowed.
Editing a Student
Edits an existing student in TeachWhat!.
Command word: editstudent / es
Format: editstudent <STUDENT_ID> [-n NAME] [-p PHONE_NO] [-e EMAIL] [-a ADDRESS] [-t TAG]
Example: editstudent 2 -n Sammy -p 123 -t codinggod -t extrageeky -t extrahansum
Suppose the student with the <STUDENT_ID> of 2 is “Sammy boyo”. The edit command above will cause the changes shown.
| Before | After |
|---|---|
| Name: Sammy boyo Phone no.: 911 Email: sam@gmail.com Address: 123 West Coast road Tags: geeky, hansum |
Name: Sammy boyo Phone no.: 123 Email: sam@gmail.com Address: 123 West Coast road Tags: codinggod, extrageeky, extrahansum |
![]() Note that:
Note that:
- At least one prefix must be given to edit the student.
- If tags are provided, all existing tags will be replaced with the new tags.
Deleting a student
Deletes a student from TeachWhat!
Command word: rmstudent / rms
Format: rmstudent <STUDENT_ID>
Example: rmstudent 13
Adding a lesson
Adds a lesson to TeachWhat!
Command word: addlesson / al
Format: addlesson [-r] -n <LESSON_NAME> -d <DATE_OF_LESSON> -t <STARTING_TIME> [-h DURATION_OF_LESSON_IN_HOURS] [-m DURATION_OF_LESSON_IN_MINUTES] [-s LESSON_SUBJECT] [-a ADDRESS_OF_LESSON]
-r in your command! If it is a temporary lesson, simply leave it out.
Duration: At least one of the optional prefixes
-m or -h must be used to specify the duration of the lesson.
![]() Note that:
Note that:
- The subject and address are optional fields and can be omitted so that the tutor only keeps the most vital information of the lesson.
- Lesson durations cannot be greater than 24 hours!
- You can use
-hand-mtogether to specify a more precise duration - Lesson name is limited to 50 alphanumeric characters with spaces allowed.
- Address is limited to 100 characters.
Example: addlesson -r -n Biology group 1 -s Biology -a Blk 11 Ang Mo Kio Street 74, #11-04 -d 27-02-2022 -t 18:00 -h 1 -m 50
Adds a recurring lesson with the following attributes:
- name: Biology group 1
- subject: Biology
- where the lesson is conducted: Blk 11 Ang Mo Kio Street 74, # 11-04
- on date: 27 February 2022
- starting at: 6pm
- duration: 1 hour and 50 minutes
![]() Conflicting Lessons:
Conflicting Lessons:
If you have any existing lessons that clash with the one that you’re trying to add, TeachWhat! will not add this lesson. In this scenario, TeachWhat! will show you a warning message and also a list of such conflicting lessons.
If you still want to add this lesson, use
rmlesson to remove the list of conflicting lessons shown before proceeding to add the new lesson.
Editing a Lesson
Edits an existing lesson in TeachWhat!.
Command word: editlesson / el
Format: editlesson <LESSON_ID> [-n LESSON_NAME] [-s SUBJECT] [-a ADDRESS_OF_LESSON] [-d DATE_OF_LESSON] [-t STARTING_TIME] [-h DURATION_OF_LESSON_IN_HOURS] [-m DURATION_OF_LESSON_IN_MINUTES]
Example: editlesson 2 -n Bio Make Up Session -t 17:00 -h 2
Suppose the lesson with <LESSON_ID> of 2 is “Biology group 1”. The edit command will cause the changes shown below.
| Before | After |
|---|---|
| Name: Biology group 1 Subject: Biology Address: Blk 11 Ang Mo Kio Street 74, #11-04 Date: 27 February 2022 Start Time: 6pm Duration: 1h 50mins |
Name: Bio Make Up Session Subject: Biology Address: Blk 11 Ang Mo Kio Street 74, # 11-04 Date: 27 February 2022 Start Time: 5pm Duration: 2hrs |
![]() Note that:
Note that:
- Editing of the lesson’s type is not allowed. Recurring lessons cannot be edited to become temporary lessons and vice-versa.
- You can use
-hand-mtogether to specify a more precise duration. - If you are changing the lesson’s duration, take note that durations of the lesson cannot be greater than 24 hours!
Deleting a lesson
Deletes the specified lesson from the list of lessons.
Command word: rmlesson / rml
Format: rmlesson <LESSON_ID>
Example:
listlessons to list the lessons and display their LESSON_ID,
followed by rmlesson 5 to delete the lesson with the id 5.
![]() Note that:
Note that:
- Deletes the lesson with the specified
LESSON_ID. - The
LESSON_IDcorresponds to the number in the displayed lesson list. - The
LESSON_IDmust be a positive integer.
Assigning a student to a lesson
Assigns the specified student to the specified lesson.
Command word: assign
Format: assign -s <STUDENT_ID> -l <LESSON_ID>
Example: liststudents followed by assign -s 5 -l 11 assigns the student with <STUDENT_ID> of 5
to the lesson with <LESSON_ID> of 11.
Unassigning a student to a lesson
Unssigns the specified student from the specified lesson.
Command word: unassign
Format: unassign -s <STUDENT_ID> -l <LESSON_ID>
Example: liststudents followed by unassign -s 5 -l 11 unassigns the student with <STUDENT_ID> of 5
to the lesson with <LESSON_ID> of 11.
Finding a Student
Displays the students whose names or tags contain the input provided.
Command word: findstudents / fs
Format: findstudents <FIND_CRITERIA>
Examples: findstudents alex friends searches the student list for students whose names or tags contain the keyword “alex” or “friends”.
Finding a Lesson
Displays the lessons whose names or subjects contain the any of the keywords provided.
Command word: findlessons / fl
Format: findlessons <FIND_CRITERIA>
Examples: findlesson biology searches the lesson list for lessons with names or subjects that contain the keyword “biology”.
Clearing all entries
Clears and deletes all lessons and students from TeachWhat!
Format: clear -f
![]() Note that:
Note that:
To prevent accidental deletion on your entire list, it is mandatory for you to include -f with the command (confirmation).
Remember to include -f when typing this command!
![]() Caution:
Caution:
THIS WILL WIPE YOUR ENTIRE LESSON AND STUDENT LIST!
Help
Opens a pop-up that gives you a link to the User guide.
Format: help
Alternatively, you can press F1 to open the pop-up.
Viewing previous commands
View previously typed commands in the command text box.
While typing in the command text box, you can use
- ↑ key to go back in history and
- ↓ key to go forward in history
![]() Note that:
Note that:
Newly executed commands would be added to the history as you use TeachWhat!.
Exit
Closes TeachWhat! window.
Format: exit
FAQ
Q: How do I transfer my data to another Computer?
A: Install the app in the other computer and overwrite the empty data file it creates with the file that contains
the data of your previous TeachWhat! folder.
Q: Why are both student and lesson lists empty?
A: This is most probably due to data in the respective files that holds the data for students and lessons.
To guard against the possibility of you being misled by corrupted data, TeachWhat! will wipe all data and start from scratch if any error is found in the data files for students or lessons.
An example of such an error would be conflicting lessons being found in the data file that holds lessons.
Command summary
| Action | Format, Examples |
|---|---|
| Add Student |
addstudent <NAME> e.g. addstudent sammy boyo
|
| Add lesson | addlesson <LESSON_TYPE> -n <LESSON_NAME> -s <SUBJECT> -a <ADDRESS_OF_LESSON> -d <DATE_OF_LESSON> -t <STARTING_TIME> -h <DURATION_OF_LESSON_IN_HOURS> -m <DURATION_OF_LESSON_IN_MINUTES> |
| Delete Student |
rmstudent <STUDENT_ID> e.g. rmstudent 13
|
| Delete lesson |
rmlesson <LESSON_ID> e.g.rmlesson 5
|
| Edit Student | editstudent <STUDENT_ID> -n <NAME> -p <PHONE_NO> -e <EMAIL> -a <ADDRESS> -t <TAG> |
| Edit lesson | editlesson <LESSON_ID> -n <LESSON_NAME> -s <SUBJECT> -a <ADDRESS_OF_LESSON> -d <DATE_OF_LESSON> -t <STARTING_TIME> -h <DURATION_OF_LESSON_IN_HOURS> -m <DURATION_OF_LESSON_IN_MINUTES> |
| Assign Student |
assign -s <STUDENT_ID> -l <LESSON_ID> e.g.assign -s 5 -l 11
|
| Unassign Student |
unassign -s <STUDENT_ID> -l <LESSON_ID> e.g.unassign -s 5 -l 11
|
| List Students | liststudents |
| List lesson | listlessons |
| View Student |
student <STUDENT_ID> e.g. student 5
|
| View lesson |
lesson <LESSON_ID> e.g. lesson 2
|
| Find Student | findlesson <FIND_CRITERIA> |
| Find Lesson | findstudent <FIND_CRITERIA> |
| Clearing all entries | clear -f |
| Help | help |
| Exit | exit |